Step-by-Step Guide:
Step 1: Cleaning and Polishing:
Clean and, if necessary, polish the surface of the painted workpiece. A smoother surface enhances the gloss effect.
Step 2: Pre-Use Shaking:
Before each use, shake the pen (with the cap on) several times to ensure even distribution of the ink in the barrel. Full shaking ensures well-proportioned painting lines.
Step 3: Air Exhaust (On First Use):
With the pen tip upwards, press it to exhaust air from the pen tube and release pressure, especially on the first use.
Step 4: Test Paper Preparation:
Press the pen tip several times on test paper, allowing the paint to soak the pen tip. After soaking, cover the pen cap and let it stand for 5 minutes to soften the pen tip.
Step 5: Closing and Storage:
Close the pen cap promptly after painting, and it is recommended to store it horizontally. Patience is key—let it stand to expect optimal results.
Tips:
Avoid Eye and Mouth Contact:
Be cautious to prevent ink from coming into contact with eyes and mouth.
Age Recommendation:
Not suitable for kids under 3 years old. For preschool children, use under adult supervision.
Shaking with Closed Cap:
Shake the marker while keeping the cap closed to prevent desktop and workpiece contamination.
Erasing with Alcohol:
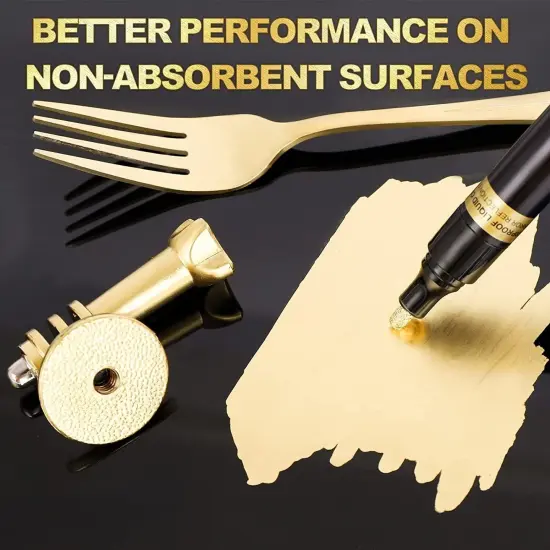
For some non-absorbent surfaces, use alcohol for modifications during painting and drawing.
Varnish Application:
After the paint fully dries, consider applying a water-based varnish for added protection and gloss.
 English
 French
![$product['description']['title']}](https://image.outdoorssports.xyz/image/240x240/TTJJcHZxSFUxVkdFeWM2QnU4SlNBWG9aakNsbXlDampDakNUcmtnUFhvY3l2a1pVRTNQc0VhU0c5NTFmajFYMTFlS1V5SlkrUDRXcHBESXE1QURWN1BNREFsa1V4VGRtaGpDcm1EWnBDMnRFZkdNR3V1OFdEK21NRWIwWjBMMFRxeElyZnBuY0JYWmlaY3F2NHBBWDBWRStPUGY2SVpubjlyaFh6aFBZdU4wMlBkaUVUdUtIOFZDTGt5OEp3bTVz/copic-classic-cool-gray-marker-set.jpg)
![$product['description']['title']}](https://image.outdoorssports.xyz/image/240x240/TTJJcHZxSFUxVkdFeWM2QnU4SlNBWG9aakNsbXlDampDakNUcmtnUFhvY3l2a1pVRTNQc0VhU0c5NTFmajFYMTFlS1V5SlkrUDRXcHBESXE1QURWN1BNREFsa1V4VGRtYjRpNzdmVCttUWkxeDgrdWhORkNSaTR0c1FkVXVGcHZ2M0IyTSs1Rkprelp1NjFGQ0hNRHVvRlFpZi85TGppTTlyaFh6aFBZdU4wMlBkaUVUdUtIOFZDTGt5OEp3bTVz/copic-basic-12-color-sketch-marker-set-version-2.jpg)
![$product['description']['title']}](https://image.outdoorssports.xyz/image/240x240/TTJJcHZxSFUxVkdFeWM2QnU4SlNBWG9aakNsbXlDampDakNUcmtnUFhvY3l2a1pVRTNQc0VhU0c5NTFmajFYMTFlS1V5SlkrUDRXcHBESXE1QURWN1BNREFsa1V4VGRtM2t5ZVJGU3M0dXpjUFlLK3ZLL0xwbkFyZG1Od1V3Z282OXgxTmJtNlQ1NXV4cmk1bCsrdTJ0WW1neWxSTFpCUzhTQTFCRWNSZExiNDFzSU13V2NMbmRJaTJ5cmd5M2Vq/art-alternatives-36-color-marker-set.jpg)
![$product['description']['title']}](https://image.outdoorssports.xyz/image/240x240/TTJJcHZxSFUxVkdFeWM2QnU4SlNBWG9aakNsbXlDampDakNUcmtnUFhvY3l2a1pVRTNQc0VhU0c5NTFmajFYMTFlS1V5SlkrUDRXcHBESXE1QURWN1BNREFsa1V4VGRtRk9iWmlDVm5HeE9naGl0a2RiK0NiMnFOcGpLN0MwZHpWNkovTUdvYU1KV1ArcmdXdlhPdGpiT2JwdWVCeTJhWThTQTFCRWNSZExiNDFzSU13V2NMbmRJaTJ5cmd5M2Vq/copic-ciao-my-first-copic-starter-set.jpg)
![$product['description']['title']}](https://image.outdoorssports.xyz/image/240x240/TTJJcHZxSFUxVkdFeWM2QnU4SlNBWG9aakNsbXlDampDakNUcmtnUFhvY3l2a1pVRTNQc0VhU0c5NTFmajFYMTFlS1V5SlkrUDRXcHBESXE1QURWN1BNREFsa1V4VGRtL2VMeW51U3MwTmZmQ25IaC85ak93aXJ5ZDdnWW5CMXdFT1A4MXJIR2wwTyt2ajNtRHN5UFcrWHdKK3RSV09lZjhTQTFCRWNSZExiNDFzSU13V2NMbmRJaTJ5cmd5M2Vq/copic-classic-12-color-basic-marker-set.jpg)
![$product['description']['title']}](https://image.outdoorssports.xyz/image/240x240/TTJJcHZxSFUxVkdFeWM2QnU4SlNBWG9aakNsbXlDampDakNUcmtnUFhvY3l2a1pVRTNQc0VhU0c5NTFmajFYMTFlS1V5SlkrUDRXcHBESXE1QURWN1BNREFsa1V4VGRtR0IwVWRKOUdTOXJyS21WM09sbzZWd3B4NUpMWmdJYWhOOUZYUDZvRDVzcEhTc3VGMDRBcUhvYk9QbGs2MWJ2SzhTQTFCRWNSZExiNDFzSU13V2NMbmRJaTJ5cmd5M2Vq/chartpak-spectra-ad-6-color-marker-set.jpg)
![$product['description']['title']}](https://image.outdoorssports.xyz/image/240x240/TTJJcHZxSFUxVkdFeWM2QnU4SlNBWG9aakNsbXlDampDakNUcmtnUFhvY3l2a1pVRTNQc0VhU0c5NTFmajFYMTFlS1V5SlkrUDRXcHBESXE1QURWN1BNREFsa1V4VGRtR0luNGNqRDBjdFlLcTk1RXlnWDBMUFJUOVM4eEd3eDE4NmZGckRaUWNmS05UZDF3MDZjUFJuZVQ4Lzh1N3YvRThTQTFCRWNSZExiNDFzSU13V2NMbmRJaTJ5cmd5M2Vq/chartpak-spectra-ad-6-color-skin-tones-marker-set.jpg)


![$product['description']['title']}](https://image.outdoorssports.xyz/image/240x240/TTJJcHZxSFUxVkdFeWM2QnU4SlNBWG9aakNsbXlDampDakNUcmtnUFhvY3l2a1pVRTNQc0VhU0c5NTFmajFYMTFlS1V5SlkrUDRXcHBESXE1QURWN1BNREFsa1V4VGRtRTBBQ0c0RklmNkN3WHpDSU8vUWlqRVdETzFmOGJSVjRiUVNKbWppNHZ6c2ZDQ3JDKzlZYlZaeUVsNWpKWWNILzhTQTFCRWNSZExiNDFzSU13V2NMbmRJaTJ5cmd5M2Vq/copic-ciao-basic-colors-marker-set.jpg)
![$product['description']['title']}](https://image.outdoorssports.xyz/image/240x240/TTJJcHZxSFUxVkdFeWM2QnU4SlNBWG9aakNsbXlDampDakNUcmtnUFhvY3l2a1pVRTNQc0VhU0c5NTFmajFYMTFlS1V5SlkrUDRXcHBESXE1QURWN1BNREFsa1V4VGRtZ2NoclEyeDc3cEFPUDJ2Kzg4OXNzeGhNcldHdGJBMjJkTHZicEFnNk1QRkxnNTlsek9QeWVQZ0x1MUVHWmRMTDhTQTFCRWNSZExiNDFzSU13V2NMbmRJaTJ5cmd5M2Vq/copic-ciao-36-color-marker-set-c.jpg)
![$product['description']['title']}](https://image.outdoorssports.xyz/image/240x240/TTJJcHZxSFUxVkdFeWM2QnU4SlNBWG9aakNsbXlDampDakNUcmtnUFhvY3l2a1pVRTNQc0VhU0c5NTFmajFYMTFlS1V5SlkrUDRXcHBESXE1QURWN1BNREFsa1V4VGRtRlZaT05uYjdMTzBRUmR2Z0Z2SjhwZWpXT0tLWFQzaWpnSTBkUnNCVDZKbXlmdld2V2FqcU1weEg1ak1maFZEd3BwNFRxUEY0QmIzMnVGZk9FOWk0M1RZOTJJUk80b2Z4VUl1VEx3bkNibXc9/copic-sketch-72-color-marker-set.jpg)